|
View Options
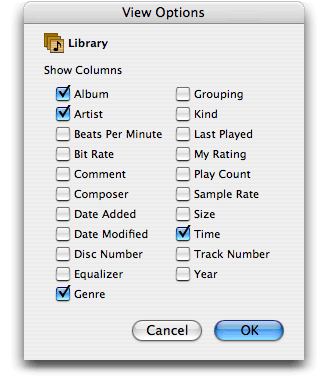
In iTunes you can customize your view of library and playlist
columns however you like. What track information is most important
to you - Song Name, Time, Album, Artist, Genre, My Rating, Last
Played (date), Date Added, Year, Play Count? In Edit > View
Options you can show or hide up to 21 columns in your jukebox.
You can even move the columns around by clicking and dragging
the column headings. It's your jukebox. You can lay it out anyway
you choose.
If you click a column heading, you sort your music library by
the information in that column - My Ratings, Genre, Year or alphabetically
by song name, album or artist, etc. Another click to the column
heading reverses the sort order.
Adding Songs from CDs Top
To quickly add a song from a CD to an existing playlist, insert
the CD, then drag the song from the list of CD tracks to the
playlist. The song is automatically imported into your library
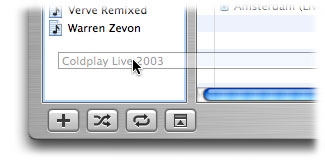
and added to the playlist. To add a song from a CD to a new playlist,
drag the song from the CD to the white area below the items in
the Source list. The song is imported into your library and added
to a new playlist.
Converting WMA Files
In iTunes for Windows, you can convert your unprotected WMA files
to AAC files (or whatever file format is chosen in the Importing
pane of iTunes Preferences) without changing the original WMA
file. Simply drag the WMA files into your library in iTunes and
iTunes does the grunt work, converting them for you. Windows
Media Player 9 or later must be installed to convert unprotected
WMA files. Protected WMA files cannot be converted.
Renaming
To rename a song, album or CD, select its name in a list, then
click the name again.
Changing Track Information
When you change information in the library, the change affects
all your playlists, too.
Editing CD Information
To quickly enter CD information for all the songs on a CD, select
the CD in the Source list and choose File > Get Info. You
can enter basic CD information once for all the songs on the
CD.
Playlist Windows Top
To open a playlist in a new window, double-click the playlist
icon in the Source list.
Playlists from Albums
To quickly create a playlist from selected songs, select the
songs in your library and then choose File > New Playlist
From Selection or type shift-command-N.
You can also click Library and choose Edit > Show Browser
(if you see only Hide Browser, then the browser is already visible).
Drag an album from the Album list in the top-right section of
the library to the white area below the items in your Source
list. A playlist named after the album is created.
Copying Songs Between Playlists
To copy a song from one playlist to another playlist, drag the
song to a playlist in the Source list.
CDs from Albums
To make your own CD from an album in your library, click Library
and choose Edit > Show Browser (if you see only Hide Browser,
then the Browser is already visible). Drag an album from the
Album list in the top-right section of the library to the white
area below the items in your Source list. Click the new album
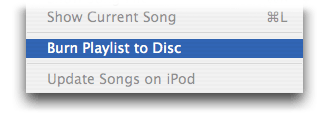
playlist icon to select it, then choose File > "Burn
Playlist to Disc."*
Print CD Inserts
You can print a list of the songs in your library or a selected
playlist to use as a CD jewel case insert, or simply to have
a song or album list. Select your library or a playlist and choose
File > Print. Choose whether you want to print a CD jewel
case insert or song or album list. Select a printing theme from
the Theme pop-up menu. Themes allow you to change how the information
is printed. When you're done, click Print.
Compilation Albums Top
To see all the songs on a compilation CD grouped together in
your library, make sure Group compilations when browsing is selected
in iTunes > Preferences (Windows - Edit > Preferences).
In Mac OS X, you can open Preferences from the iTunes menu, or
in Windows, choose Preferences from the Edit menu. If this checkbox
is deselected, artists from compilation CDs appear individually
in the Artist list in browse view.
Track Times
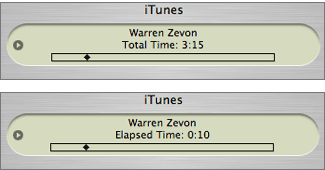
To switch between total, elapsed and remaining time, click the
time display at the top of the iTunes window. (You might need
to double-click a song to see the time display.) Click the song
title to switch between artist, title and album name.
Total Times
To switch between the approximate and precise time for all the
songs in the selected playlist or the library, click the time
displayed at the bottom of the iTunes window.

Scratching Tracks
To scan forward or back when a song is playing, drag the diamond
in the progress bar.
Avoiding Blank CD Alerts
To avoid the message that appears when you insert a blank CD,
click the Burn button before inserting the blank CD.
* iTunes for Windows,
"control-click" = "right-click." Menu items
may vary.
iTunes Music Store Previews
Top
To listen to a preview of a song in the iTunes Music Store, double-click
a song. If your network connection is slower than 128 kbps, the
preview may sound jittery. Choose iTunes > Preferences (Windows
- Edit > Preferences), and in the Store pane select the "Load
complete preview before playing" checkbox.*
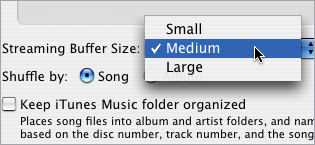
Buffer Sizes
If you have a fast Internet connection (DSL or cable modem),
you can have the music that's streamed to your computer (Music
Store previews, radio stations, shared music libraries) begin
playing more quickly by choosing the Small streaming buffer size
in the Advanced pane of iTunes > Preferences (Windows - Edit
> Preferences). If you have a slower Internet connection (modem),
you can choose the Large buffer size for smoother streaming playback.
Quick Links
To quickly find more music in the iTunes Music Store from an
artist in your library or perhaps a cover of the same song by
a different artist, click the arrow next to the artist or song
title in your library. To do so, open iTunes > Preferences
(Windows - Edit > Preferences) and make sure you check Show
Links to Music Store.
Smart Playlists
An easy way to keep track of your music by genre or artist is
to create Smart Playlists. A Smart Playlist continuously searches
your music library for new tracks meeting the criteria you set.
For example, you may want to have all your R&B/Soul music
in one playlist. If you set up a Smart Playlist, it will gather
every R&B/Soul song in your library and continuously add
to the playlist new R&B/Soul songs imported into your library
in the future.
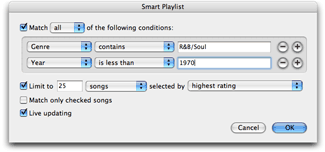
You can even set up one Smart Playlist for multiple genres -
R&B/Soul, Pop and Hip Hop/Rap. Not only that, you can also
include or exclude songs you gave certain ratings or tracks from
certain artists or albums. iTunes gives you 21 conditions to
set as criteria for Smart Playlists, including Artist, Album,
Year, Song Name, (Date) Last Played, Date Added, Genre, Composer,
My Rating, Play Count and more.
The following are common Smart Playlist themes: genres, favorite
artists or composers, songs played the most or never played at
all, highest-rated songs, oldest Last Played songs, songs from
a special year and many more options. To make a Smart Playlist
in iTunes, go to File on the menu bar, then New Smart Playlist.
Share your Playlists Top
You can share your musical tastes with other people by publishing
your best playlists on the iTunes Music Store for anyone to see,
listen to and rate from one to five stars. Shared playlists include
30-second previews of any songs in your playlist that are also
available on the iTunes Music Store. If a song in your playlist
is not available on the Music Store, the song isn't listed in
the shared playlist.
To share a playlist, select the one you want to share. Click
the Publish arrow to  the
right of the playlist in the Source list. If you don't see the
publish arrow to the right of a playlist in the Source list,
make sure the "Show links to Music Store" checkbox
is selected in iTunes > Preferences (Windows - Edit > Preferences).
Then enter the requested information about your playlist and
click Publish. the
right of the playlist in the Source list. If you don't see the
publish arrow to the right of a playlist in the Source list,
make sure the "Show links to Music Store" checkbox
is selected in iTunes > Preferences (Windows - Edit > Preferences).
Then enter the requested information about your playlist and
click Publish.
Changes you make to your playlist after it's published are not
updated automatically on the iTunes Music Store. You need to
click the Publish arrow each time you make a change that you
want to share.
Start the Party
Let's get the party started. And just as important - let's keep
it going. iTunes Party Shuffle takes over as deejay, so you can
relax and enjoy your party. Open iTunes > Preferences (Windows
- Edit > Preferences), click Show Party Shuffle and then click
OK. Select Party Shuffle from the Source list and iTunes creates
a random playlist from music in your library. If you like you
can change the Source (at the bottom of Party Shuffle playlist)
from Library to select playlist.
More Party Shuffle options let you choose to see the last 5-100
songs played or none at all, as well as the next 5-100 songs
that will play. Another nifty option lets you direct Party Shuffle
to play higher rated songs more often. Using these options, you
can add, remove and rearrange songs in the random playlist on
the fly, leaving you with an awesome playlist and more time to
party.
Control-click Shortcuts
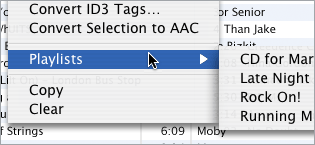
You can Control-click songs, playlists, column headings and many
other items in iTunes to do certain tasks more easily. For example,
to see all the playlists that include a particular song, press
the Control key and click the song, then scroll down to Playlists.
 Back
to Top Back
to Top
|


 Back
to Top


 the
right of the playlist in the Source list. If you don't see the
publish arrow to the right of a playlist in the Source list,
make sure the "Show links to Music Store" checkbox
is selected in iTunes > Preferences (Windows - Edit > Preferences).
Then enter the requested information about your playlist and
click Publish.